Gulp: Moving your Development Theme Outside of WordPress
So, recently my WordPress theme, The M.X. needed an update and it didn’t pass Theme Check. I ran Theme Check and it wouldn’t even load the theme files, easily maxing out the PHP file size limit.
It didn’t even dawn on me that I had all of the development files inside the parent folder within wp-content. That included the massive node_modules folder. So, I decided to temporarily remove the node_modules folder and run Theme Check again. When I did, all of the required development directories and files for were causing the theme to fail.
That is when I decided there has to be a better way. For The M.X., I placed the entire directory in my computer’s Home folder and linked it to a folder in wp-content with the same name. Let me explain how below, with how to adapt one of your own themes, too.
This tutorial is a follow up to Automating WordPress Theme Updates with Gulp. In it, we explored how to set up and manage a theme with Gulp. As such, this tutorial assumes a theme you’ve created and already implemented Gulp to manage.
The Setup
The first thing we will do is quite extreme. We will completely remove the theme parent folder from the wp-content directory. But, before we even do that, we might not be able to remove the theme folder. This is especially true on a Linux distribution, depending on where WordPress was installed.
One good thing to have is the ability to change files as you please (at least in wp-content). In order to do that, your Linux user account must have proper permissions. Your user account may not have proper permissions if WordPress was installed under a directory owned by the root user.
I can only give advice for Apache, since that is the server I am using. So, first and foremost, we need to find Apache’s root. To do so, we can search from the command line.
Apache Server Root for Ubuntu/Derivatives
grep -i 'DocumentRoot' /etc/apache2/sites-available/000-default.conf
Apache Server Root for Arch/CentOS/Fedora/Derivatives:
grep -i 'DocumentRoot' /etc/httpd/conf/httpd.conf
Source: https://www.tecmint.com/find-apache-documentroot-in-linux/.
Armed with that information, see the article Ubuntu Linux, Permissions and a Local WordPress Install to give your user account permissions. From that article, replace the folder reference in chgrp with the server root result above.
If WordPress was already installed in your Home directory, you likely already have proper permissions and can ignore the permissions article.
Creating a Symbolic Link
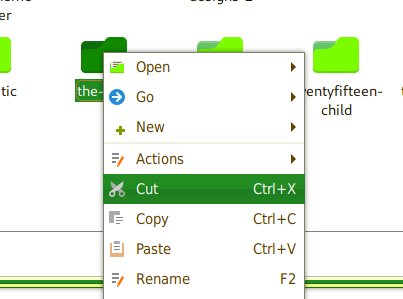
I cut my theme folder from wp-content and pasted it into a Development folder. You can name the folder a title of your choice.
The next step is to create a symbolic link to WordPress’s wp-content directory. Note that the following command assumes installation inside of a wordpress subdirectory.
ln -s ~/Development/the-m-x/build document/root/wordpress/wp-content/themes/your-theme-name
Replace document/root with your server’s.
Update for systemd Linux systems
Recently (in 2026), after updating Arch, WordPress was not showing my symbolically linked themes in the Admin. This indicated that WordPress was not recognizing the symbolic links.
After asking AI about it, it said that systemd was turning ProtectHome to true to block servers from seeing the user’s home directory. This is a good security practice.
Setting ProtectHome to false will weaken security for your home folder, as the true setting sandboxes Apache in the case of a malicious plugin or so.
Luckily, there is a middle ground. We will set ProtectHome to tmpfs. This lets Apache see only the folders you want it to see. In my case, it is the Development folder. In a terminal type:
sudo systemctl edit httpd.serviceThis will open the nano (or similar) editor. Place above the line ### Edits below this comment will be discarded
[Service]
ProtectHome=tmpfs
BindPaths=/home/user/Development
Replace user with your Home user name, and Development with the folder where you are placing your development themes.
After that, you will need to restart the daemon and Apache. Run these one at a time:
sudo systemctl daemon-reload
sudo systemctl restart httpd
The AI tool referenced the guide How to Use systemd ProtectSystem and ProtectHome Directives on Ubuntu. The methods in the guide used the command line and will work on any Linux distro that uses systemd. Read on to explore the options available for ProtectHome.
Building ‘Build’
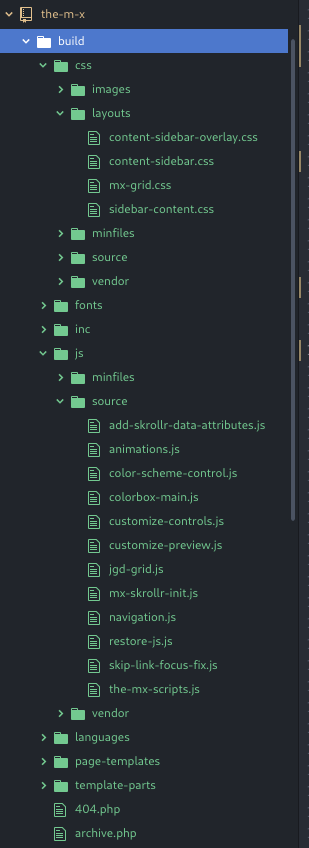
Now is a good time to review The M.X.’s directory structure. Below is a screenshot in the Atom text editor.
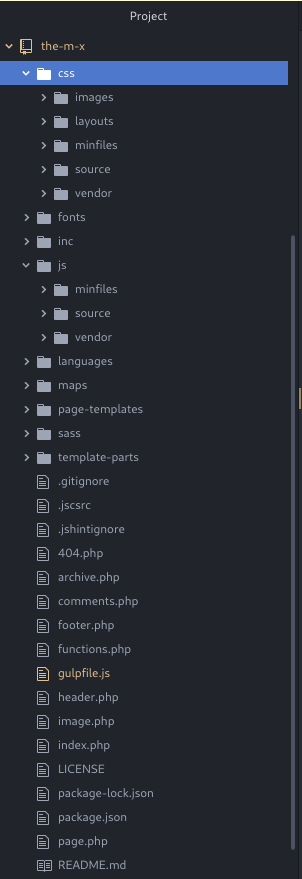
In it, we have our main .php files, screenshot.png, readme.txt, at the top level. We have subdirectories with directories within, such as css/, js/, etc. Here is a where it is a good idea to review your own theme’s structure.
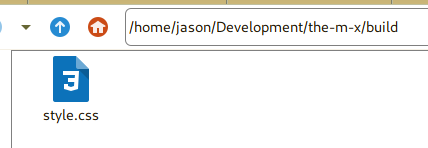
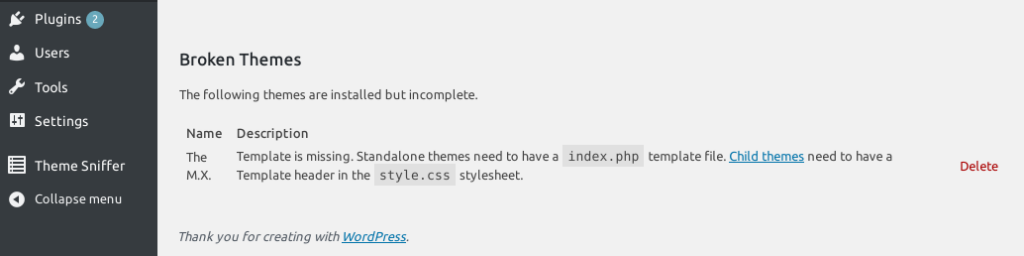
First, just to test whether the symbolic link works, let’s manually add the build folder to our theme’s root directory, then copy and paste the bare minimum: style.css. At the bottom of the screen, you should see a Broken Themes message.
What we want to do is take our theme’s files and copy them to the linked build folder. Following the information in Automating WordPress Theme Updates with Gulp, our files that were copied to the dist/ folder will now point to /build.
PHP
Let’s start with our main files. In the previous tutorial, we had the copyMainFiles gulp task for .php, css files, etc.
function copyMainFiles(done) {
    gulp.src([
        './*.php',
        '!./dist/*.php',
        './*.css',
        '!./dist/*.css'
    ])
        .pipe(gulp.dest('./dist'));
    done();
}
The M.X.’s is similar, including also screenshot.png and readme.txt. Instead of including those in copyMainFiles, we are going to adjust the function to copy over only the top level CSS and other files, while adding a new function for .php files only.
function copyMainFiles(done) {
    gulp.src([
        './*.php',
        '!./build/*.php',
        './*.css',
        '!./build/*.css',
        'readme.txt',
        '!./build/readme.txt',
        './screenshot.png',
        '!./build/screenshot.png'
    ])
        .pipe(gulp.dest('./build/'));
    done();
}

function copyPHP(done) {
    gulp.src(‘./*.php’)
        .pipe(gulp.dest('./build'));
    done();
    console.log('PHP files copied');
}
At the bottom of the file, add our new export.
exports.copyPHP = copyPHP;
Your theme might also have a watch command that automatically runs a fucntion when a file is changed. The copyPHP function makes for fewer files to copy over in the watch command. Let’s adjust it to use the new function:
function watch() {
    …
    gulp.watch('./*.php', copyPHP);
    gulp.watch('./**/*.php').on('change', reloadBrowser);
    …
}
In some themes, this should be enough for a functional theme, but in The M.X., the functions file requires files inside the inc folder, so it breaks. We’ll use that as an example to bring in PHP files in subfolders.
If your theme has an includes (inc) folder, let’s copy that to build as well.
function copyInc(done) {
    gulp.src('./inc/**/*.php')
        .pipe(gulp.dest('./build/inc'));
    done();
    console.log('Inc folder copied.');
}
Run copyInc in watch as well:
function watch() {
    …
    gulp.watch(‘./*.php’, copyPHP);
    gulp.watch(‘./inc/*.php’, copyInc);
    gulp.watch('./**/*.php').on('change', reloadBrowser);
    …
}
In The M.X., the inc folder is rather large with many files. That is why I enlisted the help of the gulp-newer plugin to move over only the most recently updated files.
In a terminal, add gulp-newer.
npm install gulp-newer –save-dev
Then in gulpfile.js…
var newer = require('gulp-newer');
…
function copyInc(done) {
    gulp.src('./inc/**/*.php')
        .pipe(newer('./build/inc')
        .pipe(gulp.dest('./build/inc'));
    done();
    console.log('Inc folder copied.');
}
In the last tutorial, we made copy functions for the rest of our PHP folders. We can simply change those to point to /build and add a new watcher for those folders, as shown above. Remember that subfolders use the matching pattern ./**/*.php.
CSS
In the last tutorial, we had a copyFiles export at the bottom of the file. Since our final theme will not need the Sass files themselves, you can remove the copySass part from the series.
Similar to how we did the PHP files, we want to copy to the /build folder in place of /dist.
function copyCSS(done) {
    gulp.src('./css/**/*.css')
        .pipe(gulp.dest('./build/css'));
    done();
    console.log('CSS folder copied.');
}
Like how we did for PHP files, we can get more fine tuned by copying the CSS Layout folder specifically.
function copyCSSLayout(done) {
    gulp.src('./css/layouts/*.css')
        .pipe(gulp.dest('./build/css/layouts'));
    done();
}
…
exports.copyCSSLayout = copyCSSLayout;
Let’s use an example function that collects CSS files and combines (concatenates) them into one file, assuming an array of source files. Then it will minify and concatenate the result. Since the concatenated scripts are not needed in our main folder, but required in build, let’s point those final files to build.
layoutStyles = [ 'css-file-1.css',
    'css-file-2.css',
    'css-file-3.css' ];
...
function concatLayoutCSS() {
    return gulp.src(layoutStyles)
	 .pipe(concatCSS('layout-styles.min.css'))
	 .pipe(cleanCSS())
	 .pipe(gulp.dest('.build/css/minfiles'))
	 .pipe(browserSync.stream());
}
Now, with the help of Gulp’s series function, we can run our copy and concatenation functions every time we change a layout file. Series was described in the previous tutorial.
function watch() {
    …
    gulp.watch('./style.css', minifyStyle);
    gulp.watch(layoutStyles, series(copyCSSLayout, concatLayoutCSS));
    …
}

JavaScript
In the review for this theme, the requirements were to have copies of any minified files. So, for the JavaScript functions, we will copy over the files that get concatenated and minified.
We already have a function that copies all JavaScript files, but once again we can copy less files at a time.
jsFiles = [ './js/source/js-file-1.js',
    './js/source/js-file-2.js',
    './js/source/js-file-3.js' ];
…
function copyJSSrc(done) {
    gulp.src(jsFiles)
        .pipe(gulp.dest('./build/js/source'));
    done();
}
…
exports.copyJSSrc = copyJSSrc;
The M.X. also has a function for files to be minified and not concatenated. We can create a copy function just for those as well.
function copyJSSep(done) {
    gulp.src(jsSepFiles)
        .pipe(gulp.dest('./build/js/source'));
    done();
}
…
exports.copyJSSep = copyJSSep;
This is what a minification script might look like.
// Scripts
function minifyJS() {
    return gulp.src(jsFiles)
        .pipe(sourcemaps.init())
        .pipe(concatJS('scripts.min.js'))
        .pipe(uglify())
        .pipe(sourcemaps.write('./build/maps'))
        gulp.dest('./build/js/minfiles')
    );
}
Next, we must adjust our watch function to run the copy functions when we change one of the files. Again, we will run them before our minification/concatenation functions:
function watch() {
    …
    gulp.watch(jsFiles, series(copyJSSrc, minifyJS));
    gulp.watch(jsSepFiles, series(copyJSSep, minifySepJS));
    …
}
Now when you change a file in any of the referenced folders, it will copy to build, then minify/concatenate.
Note that functions.php should enqueue those minified final files.
Handling Sourcemaps
Many times, your theme will need a sourcemap to point to the original files instead of minified or unprocessed (by Sass) files. Particularly, if your theme uses Sass partials, it should reference the partial rather than the processed file.
In The M.X. I separated the function that processes Sass from the one that minifies the processed file. I couldn’t figure out how to have a sourcemap reference the original .scss files. But, I was able to work with the JavaScript function mentioned previously.
The problem is that we need to work with our sourcemaps in the build version that WordPress sees in order to trace our files back to the original. The best way to handle this is with the gulp-mode plugin. What gulp-mode does is execute a function dependent on whether you are in development or production mode. Let’s install and look at some code for this.
Command Line:
npm install gulp-mode –save-dev
In gulpfile.js:
var mode = require('gulp-mode')();
…
// Scripts
function minifyJS() {
    return gulp.src(jsFiles)
        .pipe(mode.development(sourcemaps.init()))
        .pipe(concatJS('scripts.min.js'))
        .pipe(uglify())
        .pipe(mode.development(sourcemaps.write('./build/maps')))
        .pipe(gulp.dest('./build/js/minfiles'));
    );
}
Source: How To Run Gulp Tasks According To Environment: Production or Development
When you run a command, such as minifyJS or watch, simply append --development on the end.
gulp minifyJS --development
For instance, the minifyJS function will only write sourcemaps when in development mode and will write nothing when in production. It still leaves behind the maps directory in build otherwise. For that, we will move on to the finishing processes.
The New Finish Up Process
I thought it would be a good idea to rename the function that copies everything at once to restoreFiles, as a way of resetting everything in case something gets screwed up. This is also a reason to keep our clean function.
exports.restoreFiles = series(clean, copyMainFiles, copyCSS, …);
We still want a finalized zip file that we can send to WordPress.org. Let’s adjust our zip function to point too… You guessed it—the build folder. First, we want to remove the ./maps folder from build.
function cleanMaps(done) {
    return del([
        './build/maps'
    ]);
    done();
}

function zipUp(done) {
    return gulp.src('build/**/*')
        .pipe(zip('the-m-x.zip'))
        .pipe(gulp.dest('dist'))
    done();
}
zipUp generates a new /dist folder and file in our parent for uploading into WordPress. The cleanAfterZip function from the first tutorial can be safely removed, as we are not copying any files to /dist anymore. We are just copying the zip file only.
Next, we can adjust our finishUp export to look like the following:
exports.finishUp = series(cleanMaps, zipUp);
Conclusion
Obviously, something like Theme Check only should not be a reason to rearrange your entire theme. But, one good thing about this way of developing is that the WordPress wp-content directory sees your theme as it would appear in it’s final form– production ready.
Thank you for reading and if you have any questions, please comment below.
Featured Image by Albrecht Fietz from Pixabay
Leave a Reply