How to Convert a Website from XHTML to HTML5
Recently, I started the process of updating my portfolio site design and code. Since the overall site that houses the portfolio runs on PHP, my first step was to convert the underlying code to use PHP includes and whatnot. My next step was to convert the old code to newer up-to-date code—XHTML to HTML5. In this article, we will look at the before and after code.
How the code is set up
The first thing we need if using PHP is the index.php file.
The portfolio calls in the header and footer with absolute PHP includes, which I will briefly touch on here. The code below in bold is what brings in the header and footer:
<?php
$document_root = $_SERVER['DOCUMENT_ROOT'];

require($document_root.'/portfolio/includes/header.php');

require($document_root.'/portfolio/includes/main_nav.php'); ?>

… html content …

<?php require($document_root.'/portfolio/includes/footer.php'); ?>
$_SERVER[‘DOCUMENT_ROOT’] is a string representing the top level directory for your website. For example, on my computer, if I echo the $document_root variable, I get /srv/http/jgpws. Then I append the portfolio subfolder and location within the subfolder.
So from here we can look at the header, main_nav, footer and a content page before and after, whereas the relevant old code will be shown in strike-through and new code in bold.
If you are not using PHP
Since this tutorial isn’t necessarily about PHP, to follow along without it you can create a folder and type each section into a single page named index.html, without the PHP code. Then, you can save the style.css file in the same folder.
Header
Old:
<?php echo “<?xml version=\”1.0” encoding=\”utf-8” ?>”; ?><!DOCTYPE html PUBLIC "-//W3C//DTD XHTML 1.0 Transitional//EN" "http://www.w3.org/TR/xhtml1/DTD/xhtml1-transitional.dtd"><htmlxmlns=”http://www.w3.org/1999/xhtml”> <head> <title>My Portfolio</title> <link href=”portfolio.css” rel=”stylesheet”type=”text/css” /> … </head> <body id=”body” class=”bgImage”> <div id=”wrapper”> <divid=”header” class=”centered”> <div> <h1><a href=”index.php” id=”mastheadlogo” title=”My Portfolio logo”>Jason Gonzalez: Portfolio</a></h1> </div> </div>
New:
<!doctype html>

<html lang="en">

<head>
    <meta charset="utf-8">
    <meta name="author" content="Your Name">
    <meta name="viewport" content="width=device-width, initial-scale=1.0">
    <title>My Portfolio</title>
    <link href="style.css" rel="stylesheet">
</head>

<body id="body" class="bgImage">
    <div id="wrapper" class="wrapper"><!-- opens wrapper div -->
        <header id="header" class="header centered">
            <div>
                <a href="../index.html"  id="jgpwslink" title="JGPWS logo">Back to JGPWS</a>
            </div>
            <div>
                <h1><a href="index.php" id="mastheadlogo" title="My Portfolio logo">Jason Gonzalez: Portfolio</a></h1>
            </div>
        </header>
In updating the code, I added some meta tags including the viewport tag needed for responsive design. This portfolio hasn’t been updated in a long time, as you can see. In addition, I changed the div header to the more semantic HTML5 header tag.
Notice how much simpler things are? We don’t need an extra long doctype or anything other than the language type attribute in the html tag.
Navigation
Old:
<div id="left"><div id="navlist"><ul> <li><a href="current_recent.php" title="Recent/Current Projects">Recent</a></li> <li><a href="#" title="Digital Imaging">Digital Imaging</a></li> <li><a href="#" title="Illustration">Illustration</a></li> <li><a href="#" title="Page Layout">Page Layout</a></li> <li><a href="#" title="Photography">Photography</a></li> <li><a href="#" title="Web Design">Web Design</a></li> <li><a href="#">Contact</a></li> </ul></div></div>
New:
<aside class="left">
    <nav class="navlist">
        <ul>
            <li><a href="current_recent.php" title="Recent/Current Projects">Recent</a></li>
            <li><a href="#" title="Digital Imaging">Digital Imaging</a></li>
            <li><a href="#" title="Illustration">Illustration</a></li>
            <li><a href="#" title="Page Layout">Page Layout</a></li>
            <li><a href="#" title="Photography">Photography</a></li>
            <li><a href="#" title="Web Design">Web Design</a></li>
            <li><a href="#">Contact</a></li>
        </ul>
    </nav>
</aside>
The main navigation was even simpler. I replaced the outermost div with an aside tag, which represents content that is not directly related to the page’s main content. This is ideal for a sidebar. I additionally replaced the ids with classes. On a side note, these class names will probably change once I implement responsiveness into the design.
I made the links fake here, only providing the first link to show how to find the include file from the document root in PHP.
Footer
Old:
<divid=”footer”> <p class="centered"><a href="index.php">Up to Index Page</a> | Validate this page: <a href="http://validator.w3.org/check?uri=referer"><img src="http://www.w3.org/Icons/valid-xhtml10" alt="Valid XHTML 1.0 Transitional" height="31" width="88" border="0" /></a></p> </div> </div> </body> </html>
New:
        <footer id="footer" class="footer">
            <p class="centered"><a href="index.php">Up to Index Page</a> | © 2019 My Self</p>
        </footer>
    </div><!-- closes wrapper div -->
</body>

</html>
A Content Page
Old:
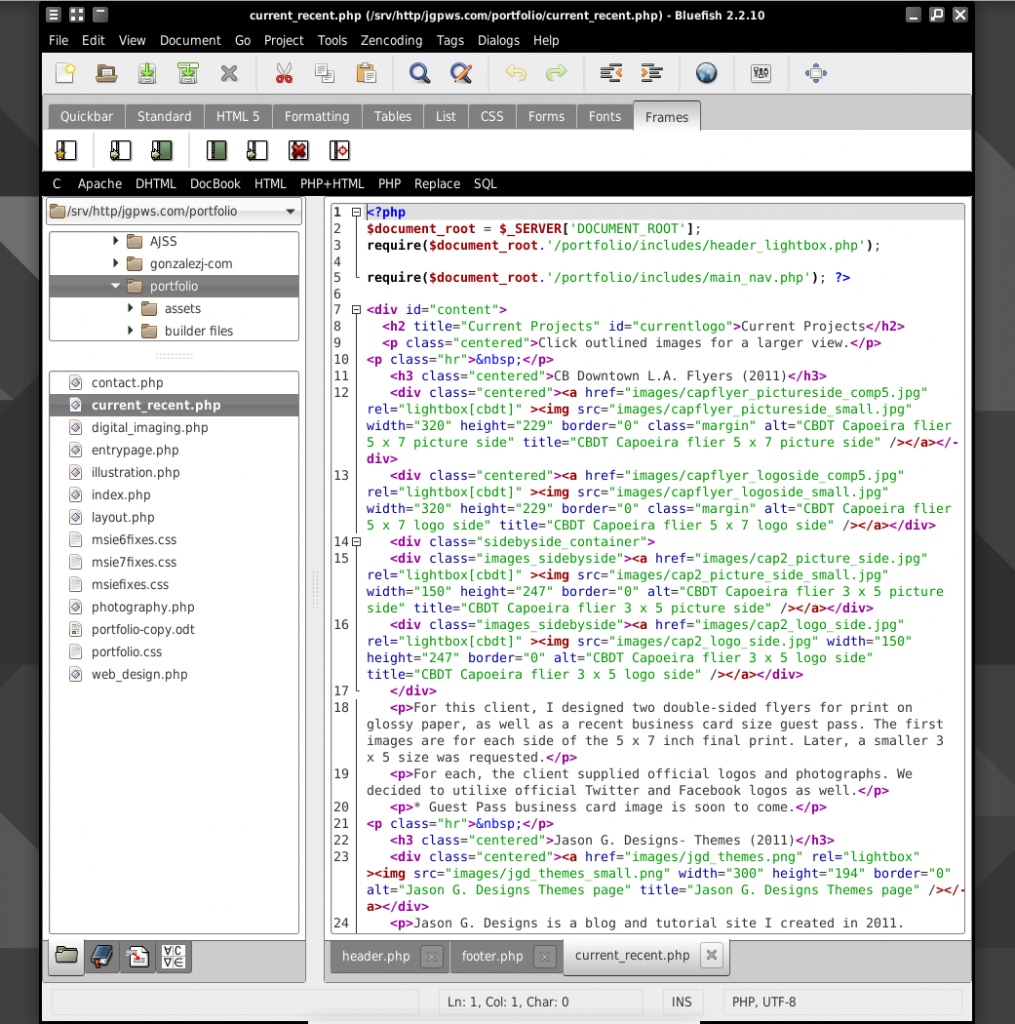
Since the code for a content page in my portfolio was too much typing, I posted a screenshot below, depicting the xhtml code:
New:
The example given is for a page showing current projects, which I will reference in a truncated fashion below:
<?php
$document_root = $_SERVER['DOCUMENT_ROOT'];
require($document_root.'/portfolio/includes/header.php');

require($document_root.'/portfolio/includes/main_nav.php'); ?>

<main id="main" class="content">
    <h2 title="Current Projects" class="content__title content__title--current">Current Projects</h2>
        <p class="centered">Click outlined images for a larger view.</p>
        <div class="hr"> </div>

    <article class="entry">
        <header class="entry__header">
            <h3 class="centered">CB Downtown L.A. Flyers (2011)</h3>
        </header>
        <div class="centered"><a href="#">...</a></div>

        <p>For this client, …</p>
        <p>For each, the client supplied official logos and photographs. …</p>
        <p>* Guest Pass business card image is soon to come.</p>
        <div class="hr"> </div>
    </article>

    <article class="entry">
        <header class="entry__header">
            <h3 class="centered">Jason G. Designs- Themes (2011)</h3>
        </header>

        …
    </article>
</main>

<?php require($document_root.'/portfolio/includes/footer.php'); ?>
Around each project entry in the portfolio, I wrapped them in article tags, which the browser sees as similar to a post entry. Above that, I wrapped the entire content area with the main tag for our main content. To illustrate that you can use the header tag in more than one place in HTML5, I added header tags around the project headings.
You might notice the weird looking syntax with the heading class name. That is BEM syntax—short for Block, Element, Modifier. Once I convert the CSS over to use this new syntax, I may explore this in another tutorial.
In Conclusion
As you can see, converting a website from XHTML to HTML5 can be rather easy. But, it can get tedious if you have a lot of pages and aren’t using a content management system. This portfolio has a few pages, but converting it didn’t take much longer than a couple of hours.
Do you want to convert your underlying website code to HTML5, or does it not matter? After all, everything does look the same on the outside.
1 Comment
Trackbacks and Pingbacks
Trackback URL for this post: https://www.jasong-designs.com/2019/09/29/how-to-convert-a-website-from-xhtml-to-html5/trackback/
-
[…] a previous article, I described how while redesigning my portfolio, I updated the code to use HTML5 rather than XHTML. In this follow-up, we will explore how to convert the previous desktop only […]
-
[…] to part 3 of this responsive design series, even though the title suggests a second tutorial. In part 1, we converted XHTML code to HTML5. In the second tutorial, we focused on adjusting the CSS for the […]
of course like your website however you need to check the
spelling on several of your posts. Several of them are rife with spelling
issues and I find it very troublesome to tell the truth on the other hand
I’ll certainly come back again.