How to Limit the Number of WordPress Gallery Thumbnails
Upon creation of my latest theme, The M.X., I implemented a way to limit the thumbnails presented within a gallery using php. In The M.X., the functions associated work within the Gallery post format and on non-single pages. So, I followed the tutorial How to limit WordPress gallery thumbnails in the loop. In the article, it describes how to use the get_posts() function to grab all of the attachments associated with a post, then loop through each one, grabbing the IDs. The recommended method to display the result is with do_shortcode within the Loop.
Since I am using the results outside the Loop, I applied this method to a filtered version of the gallery. See Plugin API/Filter Reference/post gallery in the Codex for more information. I first copied the entire code for the gallery from the core file media.php (this will be detailed later) and added the result of the ids from the tutorial to the include function in the filtered gallery code. That will also be explained later.
Everything worked like a charm. That was until I tried to change the order of the gallery images and update the post. Nothing changed on the frontend! So I had to find a workaround to this issue. I must note that I didn’t test the tutorial’s method of applying the changes with do_shortcode, so that might work. Also, the method used in this tutorial is a quite a bit involved.
The M.X.’s setup
In the M.X., I have it set up for users to select the number that they want to limit the gallery thumbnails from a Customizer control. The code for that is on GitHub:
- Customizer controls– In your browser, use its Find feature (usually Ctrl+F) to find the_mx_limit_gal_thumbs
If you want your theme’s users to limit the thumbnails, copy and paste the setting and control, and apply it to a Customizer section in your theme. Replace the_mx with your theme’s slug. If you just want to supply a single number to limit the thumbnails with, then you can exclude the Customizer controls.
Preparing our Setup
With the original tutorial’s method, the functions returns a string of comma separated ids. Originally, I had a helper function that switched each option key from the Customizer and showed a number value. It looked similar to the following:
function the_mx_number_thumbs_switcher() {
...
    $gallery_thumbcount = get_theme_mod( 'the_mx_limit_gal_thumbs' );
    switch( $gallery_thumbcount ) {
        case 'one':
        return 1;
    break;
        case 'two':
        return 2;
    break;
    ...
    default:
        return 6;
    }
}
Next, I copied the code that displays WordPress native galleries from media.php. This part still has to be done as part of this tutorial. The latest code is at WordPress core’s GitHub page under media.php. From there, Control+F in your browser and type gallery. It will lead to code that begins with add_shortcode( 'gallery', 'gallery_shortcode' );.
You will want to copy everything beginning with function gallery_shortcode( $attr ) { down to the closing curly brace }. Just above the closing curly brace will be return $output;.
- Once you have this code copied you can place it into a new file
- First, Save the new file as something like gallery-functions.php inside your theme’s main directory. If you are using an Underscores based theme, the inc folder is a good location
- Create a function:
theme_slug_limited_gallery( $attr ) { $post = get_post(); $mx_thumbcount = theme_slug_number_thumbs_switcher(); if( !is_single() ) { // Copied code } } - Paste the copied code inside of the
!is_singlecheck. This will execute the copied (filtered) code on any page that is not a single page. It makes sense to limit the thumbnails on the index and show the rest on the detail (single) page. Also replace theme_slug with your theme’s slug - Important: Remove the following code from within your pasted code:
$output = apply_filters( 'post_gallery', '', $attr, $instance );
This is the code that allows this very filter we are working with to be applied. It will break this filter because you can’t filter another filter in WordPress.
- At the bottom of the function, add your filter to the gallery:
...
}
add_filter( 'post_gallery', 'theme_slug_limited_gallery', 10, 1 );
- From here, include the gallery-functions.php file in your main functions.php file like so:
/* include gallery functions */
require get_template_directory() . '/inc/gallery-functions.php';
In the old way I was doing things, I supplied the results of the ids returned in the original tutorial as a value for the include key in shortcode_atts.
$mx_thumbcount = the_mx_get_limited_ids();
...
$atts = shortcode_atts(
    array(
    ...
    'include' => $mx_thumbcount,
    ...
    ), $attr, 'gallery'
);
As previously stated, unfortunately, the thumbnails were not updating on the frontend. I don’t know for sure why, but I’m guessing that the posts pulled from get_posts were from the database, while the shortcode’s changes didn’t save to the database?
Retreiving our IDs
So, in the new way, I removed the_mx_get_limited_ids() function and replaced it with a collection of other functions.
First, I created a function that gets the IDs (a comma separated list from within a post) with a regular expression. This was not anything original I came up with. I got the code from Hullen Gonzales’s get_gallery_attachments.php GitHub gist. That version returns an array, but I adjusted it to just return the ids.
function theme_slug_get_gallery_ids() {
    /* This function gets the gallery IDs from the shortcode */
    global $post;

    $post_content = $post->post_content;
    preg_match('/\[gallery.*ids=.(.*).\]/', $post_content, $ids);
    $images_id = $ids[1];

    return $images_id;
}
Limiting the IDs
The next step is to turn those IDs into an array, chop them up and then turn them back into a string. Here is the method I originally used (by changing the output of the_mx_number_thumbs_switcher):
function theme_slug_number_thumbs_switcher() {
    /* Function to limit gallery thumbnails by number */

    $gallery_thumbcount = get_theme_mod( 'theme_slug_limit_gal_thumbs' );
    $init_ids = theme_slug_get_gallery_ids();
    $expl_ids = explode( ',', $init_ids ); // $expl_ids = Exploded ids; impl_ids = Imploded ids

    switch( $gallery_thumbcount ) {
        case 'one':
            return $expl_ids[0];
        break;
        case 'two':
            $expl_ids = array_slice( $expl_ids, 0, 2 );
            $impl_ids = implode( ',', $expl_ids );
            return $impl_ids;
        break;
        case 'three':
            $expl_ids = array_slice( $expl_ids, 0, 3 );
            $impl_ids = implode( ',', $expl_ids );
            return $impl_ids;
        break;
        ...
    }
}
Looking closer, I noticed this produced a lot of repetition, so I wrote a helper function which automates this process. This is the method I used:
function theme_slug_limit_ids( $length ) {
    /* Helper function to grab supplied ids and limit them via array_slice */
    /* Returns a string of comma separated ids at the length specified */

    // Get ids from theme_slug_get_gallery_ids() (regular expression results)
    $init_ids = theme_slug_get_gallery_ids();

    // Turn the comma separated string into an array
    $expl_ids = explode( ',', $init_ids );

    // Chop up the exploded array from the end; length equals the total number of ids
    $expl_ids = array_slice( $expl_ids, 0, intval( $length ) );

    // Turn the array back into a comma separated string
    $impl_ids = implode( ',', $expl_ids );

    // For debugging
    /*print_r( $expl_ids );
    echo '<br>';
    print_r( $impl_ids );
    echo '<br>';*/

    return $impl_ids;
}
Let me explain what this function does. It first takes the supplied id string, the comma separated ids, and uses the PHP explode function to change them into an array, splitting each array index at the comma.
From there, the array_slice function takes the array and limits it by the number specified as $length. intval is used for making sure that number is an integer.
Then, implode is used to turn the array back into a string after being sliced.
For convenience, I included print_r functions to show the finalized array and strings. Uncomment them to see those.
Showing the Results
Finally, in our switch statement I called the function like so:
function theme_slug_number_thumbs_switcher() {
    /* Function to limit gallery thumbnails by number */
    $gallery_thumbcount = get_theme_mod( 'theme_slug_limit_gal_thumbs' );

    switch( $gallery_thumbcount ) {
        case 'one':
            return theme_slug_limit_ids(1);
            break;
        case 'two':
            return theme_slug_limit_ids(2);
            break;
        case 'three':
            return theme_slug_limit_ids(3);
            break;
        ...
    }
}
To actually display the thumbnails on the frontend, add the output of the numbers switcher function as a value for the include key in the theme_slug_limited_gallery function:
function theme_slug_limited_gallery( $attr ) {
    $theme_slug_thumbcount = theme_slug_number_thumbs_switcher();
    if( !is_single() ) {
    ...
        $atts = shortcode_atts( array(
            'include' => $theme_slug_thumbcount,
            ...
        ), $atts );
    }
}
If you are returning just a single number, then in the theme_slug_number_thumbs_switcher function, removing the surrounding switch statement and return one of the theme_slug_limit_ids function calls with a number of your choosing.
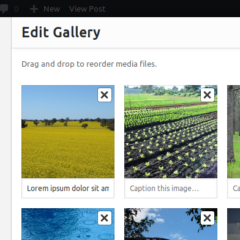
One of the most important parts of displaying the thumbnails is to make sure they display in the order a user sets in the Edit Gallery screen shown below:

In order to make sure it matches on the front end, you must specify the value for the orderby key as post__in:
function theme_slug_limited_gallery( $attr ) {
...
    if( !is_single() ) {
    ...
        $atts = shortcode_atts( array(
            ...
            'orderby' => 'post__in',
            ...
        ), $atts );
    }
}
Conclusion
These functions should work for this purpose. The one caveat with this approach is that Jetpack’s Tiled Galleries feature ends up getting overwritten. I couldn’t find a workaround for this yet. One workaround is perhaps to hook this functionality up to a Customizer control that enables or disables it, or to have this only in a Post Format, like I did.
I always advise anyone who uses the code in my tutorials to use it with precautions, as everyone’s theme and plugin environment may be different. After trying different things, this worked for my situation.
If you have any questions about this tutorial, please leave a comment below and thank you for reading it.
Leave a Reply