
Stop Copy-Pasting: Let npm Scripts Handle Your WordPress Files
I know. I know. This is an obvious A.I. title, but my readers, we are interested in speeding up final development tasks, aren’t we?
In this tutorial, we will use some scripts to combine minification scripts, remove sourcemaps, copy files to a “distribution” folder and zip up files the way WordPress likes them.
This is the third in a tutorial series with the last one being Upgrading to Modern Sass. However, you can follow the tutorial from this point with or without the sample theme. Let’s get down to business.
Environment Setup
If you wish to follow along using the sample theme, you can find it at GitHub (Tutorial Resources > npm-scripts-for-files). From this link:
- Grab the sample file the-m-x-090126.zip (download the Raw file)
- Look in your Downloads folder
- Extract or unzip the file (the resulting folder will be the-m-x-090126)
- Move the file to a folder of your choice. My example is home/username/Development/
- This theme operates outside of the actual WordPress environment. To properly get the theme to work with the WordPress backend, please see the Setting Up section in the article Upgrading from Gulp 4 to Gulp 5. It includes instructions for a traditional LAMP setup and wp-env
- Look for and Activate The M.X. from your local WordPress backend under Appearance > Themes
Combining Build Tasks Together
If you are using the sample theme, let’s open gulpfile.js to review our minification functions minifyStyle and others. These functions use gulp-if to determine if we are in or not in a production mode, based on a string typed into the command line.
There are also similar functions for JavaScript. At the bottom of the file, we combined some of these together as the exports buildCSS and buildJS.
Since, at least to me, it can get confusing to combine these considering that the buildCSS function requires a flag for production mode, I decided to delegate this task to npm.
The first thing we want to do is use the included npm-run-all. This helpful tool allows us to run our two export functions at the same time. If you are working with your own project, you will need to install it.
In the scripts section, first remove the “test” script:
"scripts": {
  "test": ...
}
Let’s add three new scripts for our minification process:
"scripts": {
  "build:css": "gulp buildCSS --production",
  "build:js": "gulp buildJS",
  "build-final": "run-p build:css build:js"
}
We first added the build:css script so we can run our Gulp CSS minification task with the production flag. Then, we added the build:js script that doesn’t need a production flag because sourcemaps are handled in a separate gulp command. Finally, we have the build-final script that combines the two.
The command run-p runs both in parallel (at the same time).
Let’s check that the current build-final script works. If you are already not logged in to the WordPress admin, you can now log in. From the backend, we will open the site in a new tab. If you are using wp-env, you will need to run wp-env start from the command line in the theme directory. Also with wp-env, Gulp or npm commands will need to be ran in a separate terminal or terminal tab.
In the browser front end view, verify that source maps are still working by right-clicking the Site Title. Under the Inspector, check the rules tab for _header.scss. Seeing this indicates that our sourcemaps are still active.
Now, let’s run build-final:
npm run build-finalIt looks like we are getting an error that says the version 1.4 is invalid and it doesn’t run. Since when I was drafting this tutorial, I wasn’t clear on what this meant, I asked Google AI.
I’m getting a weird error when running the build script Invalid version: “1.4”.
It replied with:
…npm strictly enforces Semantic Versioning (SemVer), which requires version numbers to follow a three-part format (e.g., 1.4.0)
So, let’s change the version number in package.json to 1.4.6, the latest version of The M.X. Again, we can re-run build-final.
Just to flush the cache on the website frontend, let’s do a hard reload (Ctrl-Shift-R). If we check the DevTools Inspector now for .site-title, the Rules section should now show style.min.css.

Removing Maps from the Theme
The M.X. up to this point was using del for file deletion. But since del recommends only using import syntax, I decided to replace it. I would have to change everything else to also use import syntax (and ESM modules) in the Gulp file and it would make for more complication. I may update gulpfile.js to use the newer system in the future.
Let’s remove del:
npm uninstall delIn addition, we need to remove the references to del from gulpfile.js:
const del = require("del");Since we won’t be using del anymore, we can remove the cleanMaps() function, as we will replace it with an npm script.
function cleanMaps() {
  console.log("Sourcemaps removed from build folder.");
  return del(["./build/maps"]);
}

...
exports.finishUp = series(cleanMaps, zipUp);
To now handle this task, we will use shx, which let’s us execute Unix shell like commands, but in a cross-platform way.
npm install shx –save-devWe can now add a new script using shx to remove sourcemaps, since they are no longer referenced in our files.
"scripts": {
  "build:css": "gulp buildCSS --production",
  "build:js": "gulp buildJS",
  "clean:maps": "shx rm -rf build/maps",
  "build-final": "run-s \"run-p build:css build:js\" clean:maps"
}
Okay, so there are a few things to explain here. First, we added the clean:maps script, which removes the maps from the build folder. Then, we added it to the end of our build-final script.
We also added run-s to the beginning of the call. This tells npm-run-all to run each script sequentially. Since we still want our build scripts to run parallel, we put them in a separate set of quotes. We need to escape the parallel script runs with backslashes because they are already inside of quotes.
Let’s see how the clean:maps script works:
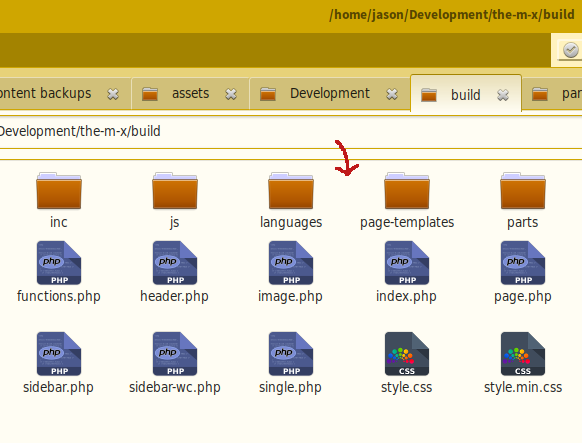
npm run clean:mapsWe can verify that the maps are gone from within a file manager, as shown in the screenshot below.
Copying Files to the Distribution Folder
Once our production ready theme is set up the way we like, we can now copy the files to a dist (distribution) folder for final processing. For this, we will add copy-to-dist to package.json– the script that will copy the files.
"scripts": {
  ...
  "clean:maps": "shx rm -rf build/maps",
  "copy-to-dist": "shx mkdir -p dist && shx cp -R build/. dist",
  "build-final": "run-s clean-dist \"run-p build:css build:js\" clean:maps copy-to-dist"
},
Note that we also added the script to the build-final script.
To test, let’s completely remove the existing dist/ folder. After, run the copy-to-dist script to copy files from the build directory into the dist directory.
npm run copy-to-distAfter running it, the dist folder should reappear populated with all of our theme files, minus stuff like node_modules, etc.
Zipping the Theme for Distribution
The WordPress backend expects a zipped theme for easy installation. Zipping a theme also is a good idea when you want to upload your initial theme or update to WordPress.org.
Instead of doing it within your operating system, we will add a convenient way to do it with scripts. If you look into gulpfile.js, you may notice that we already had gulp commands for this task. However, with the newest version of Gulp, if you have any images and fonts that need to be zipped, they will become corrupted. This is because Gulp 5 sees all files as UTF-8.
There are ways to ensure that fonts and images don’t get corrupted, but with using scripts for this, we don’t even have to concern ourselves with that.
First, from the command line, let’s uninstall gulp-zip:
npm uninsall gulp-zip…And in gulpfile.js, remove its references and the zipUp, finishUp functions:
const zip = require("gulp-zip");
...
function zipUp(done) {
  return gulp
    .src("build/**/*")
    .pipe(zip("the-m-x.zip"))
    .pipe(gulp.dest("dist"));
  done();
}
...
exports.zipUp = zipUp;
exports.finishUp = series(cleanMaps, zipUp);
I asked AI what would be a good replacement and it suggested bestzip. Let’s install it:
npm install bestzip –save-devNext, we will add a zip-theme script to package.json:
"scripts": {
  ...
  "copy-to-dist": "shx mkdir -p dist && shx cp -R build/. dist",
  "build-final": "run-s clean-dist \"run-p build:css build:js\" clean:maps copy-to-dist",
  "zip-theme": "cd dist && bestzip the-m-x.zip *"
}
We always want to make sure that we are working with a clean dist directory before we zip the theme. In other words, we want the latest codebase. For this, we will add a script named clean.js. Lets’ create a new file in the project root named clean.js.
In the Tutorial Resources page for this tutorial, you will see two files: clean-js_1.txt and clean-js_2.txt. At this point, copy and paste the text from clean-js_1.txt into the clean.js file. The code from this file was generated by Google’s AI.
The zip-theme script above generates a the-m-x.zip file. What clean.js does is check if a current zip file exists. If it does, it deletes it. Then, it empties the contents of the dist folder (everything else). This should be ran before running copy-to-dist.
First, let’s add the script to our existing scripts:
"scripts": {
  ...
  "zip-theme": "cd dist && bestzip the-m-x.zip *",
  "clean-dist": "node clean.js"
}
Now, we can run the script to see if it works:
npm run clean-distThe dist folder should be completely clear. Next, we run copy-to-dist followed by zip-theme:
npm run copy-to-dist
npm run zip-theme
If everything is working as expected, we will see a newly zipped theme file inside of the dist folder.
This looks pretty much done, but we want to remove the extra files now that the theme is ready for distribution.
That is where our newer version of clean.js comes into play. In the same Tutorial Resources page, let’s copy the text from clean-js_2.txt and replace the existing code in clean.js with it, making sure to save the file.
This new script adds a second function that deletes everything except for the-m-x.zip. It also checks the terminal for the string “–post” to run the second function.
So now let’s add that to package.json:
"scripts": {
  ...
  "clean-dist": "node clean.js",
  "clean-dist:post": "node clean.js --post",
  ...
}
Our dist folder still has the leftover files in them. Now we can run the new clean-dist:post script.
npm run clean-dist:postWe should now only have the-m-x.zip file.
Putting It All Together
Now that we have all of these scripts working to produce a final theme, let’s combine it all for the build-final script.
Before we do anything, we will put the clean-dist script first.
"scripts": {
  ...
  "build-final": "run-s clean-dist \"run-p build:css build:js\" clean:maps copy-to-dist",
  ...
}
After clean:maps, we will add our zip-theme and clean-dist:post scripts, in that order.
"scripts": {
  ...
  "build-final": "run-s clean-dist \"run-p build:css build:js\" clean:maps copy-to-dist zip-theme clean-dist:post",
  ...
}
Our build-final actually now builds everything to our final specification. I decided not to test it, but I trust that it works. If you are using something like this for your own WordPress theme, once you are finished making updates, all you have to do is run one single command.
Below is the entire script section of package.json. To make it more clear, I moved build-final to the bottom.
"scripts": {
    "build:css": "gulp buildCSS --production",
    "build:js": "gulp buildJS",
    "clean:maps": "shx rm -rf build/maps",
    "clean-dist": "node clean.js",
    "clean-dist:post": "node clean.js --post",
    "copy-to-dist": "shx mkdir -p dist && shx cp -R build/. dist",
    "zip-theme": "cd dist && bestzip the-m-x.zip *",
    "build-final": "run-s clean-dist \"run-p build:css build:js\" clean:maps copy-to-dist zip-theme clean-dist:post"
  },
The above scripts are a good way to copy and zip files without worrying about Gulp file issues. Thanks for reading and following along.
Leave a Reply