
Upgrading from Gulp 4 to Gulp 5

In a previous post, I mentioned that I will be working on my next major update for The M.X. As part of these changes, I thought to put together some tutorials documenting this process.
In this one, we will update the build tools for The M.X., which became outdated and no longer worked. For the first tutorial, we are updating Gulp, our task runner, to the latest version. I will be providing a sample file, but will add other pertinent information for general updating as well.
This tutorial was designed for people who want to update without the hassle of swapping out one build system for another and just so happen to be using Gulp.
An important disclosure is that I used AI prompting to help draft this tutorial, as this is the way many people would ask for clarification nowadays. Wherever I use AI will be noted within the tutorial. Let’s get started.
Setting Up
Since this is a WordPress tutorial, you will need a local environment and WordPress itself.
For those who would like to follow along using a sample file:
- Get it from Tutorial Resources at my GitHub account. It will be inside of the gulp-4-to-gulp-5 directory
- From there, click View Raw to download
- Within your operating system’s Downloads folder, Extract or Unzip the file
- Move the file to a folder outside of WordPress (home/username/Development/the-m-x-080526/ or another directory of your choice)
For a traditional LAMP setup
On my computer, I am using Linux, Apache, MariaDB and PHP. The older recommended setup was this.
- Create a symbolic link (
ln -s ~/Development/the-m-x-080526/build document/root/wordpress/wp-content/themes/the-m-x) - If you are using Linux with systemd, change your
httpd.serviceconfiguration file to ProtectHome=tmpfs. (see the article Gulp: Moving your Development Theme Outside of WordPress) - After navigating to the theme’s folder in a terminal (in my case, ~/Development/the-m-x-080526), type npm install
The document/root/wordpress path above is a stand-in for the path of your local WordPress installation.
For a wp-env setup
I asked the Google AI prompt if wp-env would work with symbolic links and the answer was no.
Alternatively, the best recommended steps are to set up something similar like so:
- In the root folder for the linked theme (home/username/Development/the-m-x-080526 or so), add a file named
wp-env.json - In wp-env.json, add the following code:
{
  "port": 8888,
  "themes": [
    {
      "path": "./build",
      "name": "the-m-x"
    }
  ]
}- In a terminal in the same project root, run wp-env start
- After that, run npm install to install gulp and other build tools
- We will discuss using BrowserSync (which is what this theme uses) with wp-env later in the tutorial
Keep in mind that I got this information using Google’s AI prompt. As such, it warns to use the instructions with caution.
Since I am using a LAMP setup, I can’t vouch for the total accuracy of the information. If you are using the newer, recommended wp-env setup, please let me know if you run into any issues.
Also, note that there are other ways to run WordPress locally that we won’t cover here, as that would make the tutorial too long.
Installing the Latest Gulp
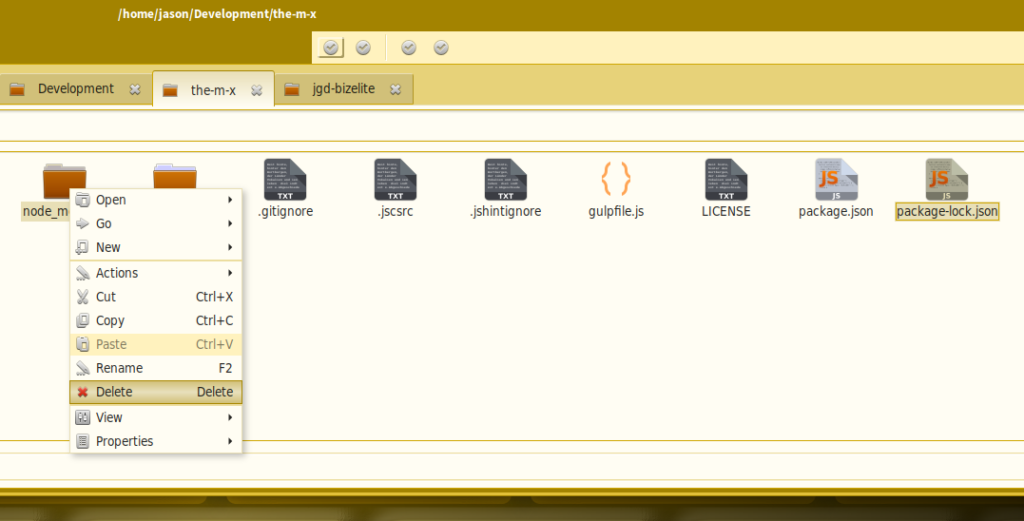
In a text editor or a file manager, remove the existing node_modules folder and the package-lock.json file.
In a terminal at the theme root, install the latest version of Gulp.
npm install gulp@latest --save-devThen we will need to run npm install one more time to reinstall our other dependencies.
After, we can run gulp style to test that it works. If you are in a wp-env environment, run the command in a separate terminal or tab.
Google’s AI noted the following information:
Global CLI Mismatch: Many developers forget they have a global Gulp CLI tool installed. If their local project is Gulp 5 but their global CLI is severely outdated, they will hit “Unsupported Gulp Version” errors.
I ran into this issue myself when updating my blog’s build tools. Run the following one at a time to update Gulp globally:
npm uninstall -g gulp
npm install -g gulp-cli
You may notice that Sass is broken after running the style task. To keep the tutorial short, we will address that in the next tutorial.
Refactoring gulpfile.js Syntax
Working with binary files
The M.X. no longer copies files from one folder to another, but if you are updating your own theme that used Gulp, copying files will need one extra step.
Gulp 5 now assumes all files are UTF-8 text strings by default. Here are two examples provided by the generated AI code:
function copyImages() {
  return gulp.src("src/images/**/*.{jpg,jpeg,png,gif,webp}", { encoding: false }) // 👈 Crucial change!
    .pipe(gulp.dest("dist/images"));
}

exports.images = copyImages;

function copyFonts() {
  return gulp.src("src/fonts/**/*.{woff,woff2,eot,ttf,svg}", { encoding: false }) // 👈 Crucial change!
    .pipe(gulp.dest("dist/fonts"));
  }

exports.fonts = copyFonts;
The italicized paths can be replaced by the paths used in your theme.
Making sure arrays are in order
According to the AI, Gulp 5 completely dropped support for ordered arrays (ordered globs). That means we will need to add the ordered-read-streams package to ensure that our arrays stay in the order specified. They must be in the order specified, as they will be concatenated together later on.
Let’s install it from the command line:
npm install ordered-read-streams --save-devOpen the supplied gulpfile.js in a text editor. Then, at the top of the file, add:
const orderedStreams = require("ordered-read-streams");In the text editor, search for the first instance of layoutStyles— an array.
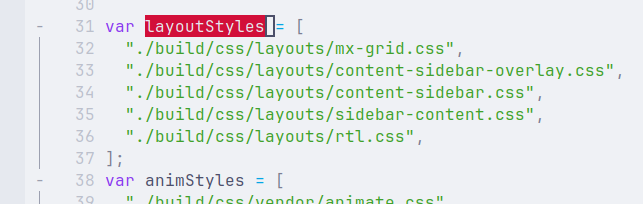
In the concatenation functions concatLayoutCSS and concatAnimCSS, replace the gulp.src reference with orderedStreams, our variable.
function concatLayoutCSS() {
  return gulp.src(layoutStyles)
  return orderedStreams(layoutStyles)
  …
}
Run concatLayoutCSS to test:
gulp concatLayoutCSSAfter running the above, you will get the error “All input streams must be readable”. That is because our array consists of just the strings of each file. That worked for our setup before. Now, however, each string must have its own gulp.src wrapper. Luckily the AI put together a small function for that. Add this just below the array variables:
function createOrderedStream(fileArray, options = {}) {
  const defaultOptions = Object.assign({ read: true }, options);
  const streams = fileArray.map((path) => gulp.src(path, defaultOptions));
  return orderedStreams(streams);
}
The createOrderedStream function takes an array of file paths, and wraps gulp.src() around each one.
So now, we will re-update the previous concatenation functions:
function concatLayoutCSS() {
  createOrderedStream(layoutStyles)
  …
}
Now when you rerun the concatLayoutCSS function, it should work as expected, combining our files in order.
We must do the same for the concatAnimCSS function (where the animStyles array lives) and the minifyJS function, which has the jsFiles array.
Renaming and testing watch
Since watch is also the name of a gulp command, let’s rename our task to eliminate confusion. Rename the watch() function to watchTask().
function watch() {
...
}

function watchTask() {
...
}
Change this also in the exports statement at the bottom of the file.
exports.watch = …

exports.watchTask = parallel(browsersyncStart, watchTask);
Next, let’s test to see if this new watchTask works! Remember, in wp-env run the task in its separate browser tab.
gulp watchTaskEven though we have everything set up correctly, we are getting the error “Task never defined: watchTask”. That’s odd. I asked the AI the following question:
So, I have a watchTask that runs several gulp.watch commands. When I run it, I am getting “Task never defined: watchTask” even though I properly renamed everything associated. Does this need a callback?
The response was “Yes, watchTask absolutely needs a completion signal (like a callback)”.
It originally thought there was no export at the bottom of the file (which there was) and that there might be string references in the series combos (which there weren’t).
Adding a callback to the task fixed the issue:
function watchTask(cb) {
  ...
cb();
}
Re-run watchTask and BrowserSync should open the theme in a new browser tab.
For a wp-env based development environment, you must configure the BrowserSync proxy, according to the AI.
browserSync.init({
  proxy: "localhost:8888", // Points to the locked wp-env port
  port: 3000, // The port that will actually load in your browser
  open: true // Automatically opens localhost:3000 on launch
});
You will still access the site from localhost:3000, but BrowserSync will get the data from wp-env.
In the text editor, open build/js/source/the-mx-scripts.js. Near the top of the file, add alert("The M.X. scripts file loaded!"); and save the file.
The theme should automatically reload, showing the alert upon reload. This tests that our JavaScript concatenation works.
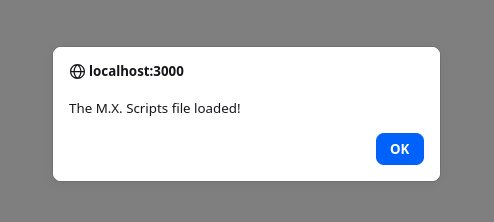
You can now remove the alert and re-save the file.
Gulp Plugin Replacements/Removals
I then asked the AI about Gulp plugin compatibility.
I have the gulp-clean-css, gulp-concat-css and gulp-uglify plugins. I would like to know which are compatible.
gulp-clean-css is compatible with version 5. I know from my previous changes of my blog site that gulp-uglify is now outdated. The AI tool also mentioned that the new ordered-read-streams plugin made gulp-concat-css redundant, as it only ensured that files were merged together predictably. We can now just use gulp-concat, which we already have.
Replace gulp-concat-css with gulp-concat
First, let’s uninstall gulp-concat-css from the command line:
npm uninstall gulp-concat-cssIn gulpfile.js change var concatCSS = require('gulp-concat-css') to const concatCSS = require('gulp-concat');
To test the CSS, run gulp concatLayoutCSS and check the design in the browser. On my computer, the address is http://localhost/wordpress, as I have WordPress in its own directory. For wp-env, this will be http://localhost:8888. The frontend should look the same after refreshing the page.
Replace gulp-uglify with gulp-terser
The AI recommended gulp-terser in place of gulp-uglify, as it supports modern ES6+ JavaScript syntax, such as arrow functions.
npm uninstall gulp-uglify
npm install gulp-terser --save-dev
In gulpfile.js, remove the gulp-uglify call and replace it with gulp-terser.
var uglify = require('gulp-uglify');
const uglify = require('gulp-terser');
To keep things simple, we will leave the variable with the name uglify.
Replace gulp-mode with gulp-if
Originally, The M.X. had the plugin gulp-mode, which differentiates between whether we are in development or production mode. For production mode, we would exclude sourcemaps. Sourcemap exclusion was working but the code wouldn’t minify with gulp-terser.
The AI response did say to add an extra parenthesis at the end within the pipeline:
function minifyJS() { return pipeline(
  …
  concatJS("scripts.min.js"), mode.production(uglify())(),
  …
}
Then, the “TypeError: mode.production(…) is not a function” error came up. After some back and forth with the AI and asking if gulp-mode was compatible with Gulp 5, it was settled to use gulp-if instead.
npm uninstall gulp-mode
npm install gulp-if --save-dev
In gulpfile.js:
var = require('gulp-mode')();
const gulpIf = require("gulp-if");
We now need to add a check for when we are in production mode. To keep it similar to the gulp-mode plugin, we will check if the terminal has the string “--production”.
Just below the gulpIf variable, add this check:
const isProduction = process.argv.includes("--production");Next, we must replace all instances of mode.production with gulpIf(!isProduction, …). For example, let’s use the minifyJS function:
function minifyJS() {
  return pipeline(
    createOrderedStream(jsFiles),

    mode.development(sourcemaps.init()),
    gulpIf(!isProduction, sourcemaps.init()),

    concatJS("scripts.min.js"),

    mode.production(uglify()),
    gulpIf(isProduction, uglify()),

    mode.development(sourcemaps.write("../../maps")),
    gulpIf(!isProduction, sourcemaps.write("../../maps")),

    gulp.dest("./build/js/minfiles")
  );
}
In the above code snippet for sourcemaps, we are checking that we are not in production mode. We must change the syntax for every instance where mode.development and mode.production were used.
The AI recommended for pipeline to use node’s native pipeline (from stream) for modern Gulp.
const { pipeline } = require("stream");After running minifyJS again, we will get “TypeError [ERR_INVALID_ARG_TYPE]: The “streams[stream.length – 1]” property must be of type function.
The AI said to add a callback function at the end of the minifyJS function. I did, but it was back to not minifying. It eventually stated to drop pipeline altogether and replace with just standard gulp pipes. Using the minifySepJS function as an example, let’s see the changes below:
function minifySepJS() {
  return pipeline(
    gulp.src(jsSepFiles),
    gulpIf(!isProduction, sourcemaps.init()),
    ...
    gulp.dest("./build/js/minfiles")
  );
}

function minifySepJS() {
  return gulp.src(jsSepFiles),
    .pipe(gulpIf(!isProduction, sourcemaps.init()))
    ...
    .pipe(gulp.dest("./build/js/minfiles"));
  );
}
Again, we will replace where all pipeline references are.
Minification is still not working, so the next recommendation was to separate the compile and build portions of the task (in minifyJS). Remove minifyJS() and replace with the following two functions:
function minifyJS() {
  ...
}

function compileJS() {
  return createOrderedStream(jsFiles)
  .pipe(sourcemaps.init())
  .pipe(concatJS("scripts.min.js"))
  .pipe(sourcemaps.write("../../maps"))
  .pipe(gulp.dest("./build/js/minfiles"));
}

function buildJSProd() {
  return createOrderedStream(jsFiles)
  .pipe(concatJS("scripts.min.js"))
  .pipe(uglify())
  .pipe(gulp.dest("./build/js/minfiles"));
}
In the watchTask, replace minifyJS with compileJS.
gulp.watch(jsFiles, compileJS);We must do the same for the minifySepJS() function as well.
After creating and using the compileSepJS function, I found out after testing that it creates an infinite loop. Do not use as is. Instead, we will adjust the buildSepJSProd function.
function compileSepJS() {
  return gulp
    .src(jsSepFiles)
    .pipe(sourcemaps.init())
    .pipe(sourcemaps.write("../../maps"))
    .pipe(gulp.dest("./build/js/minfiles"));
}

function buildSepJSProd() {
  return gulp
    .src(jsSepFiles)
    .pipe(gulpIf(!isProduction, sourcemaps.init()))
    .pipe(uglify())
    .pipe(
      rename({
        suffix: ".min",
      })
    )
    .pipe(gulpIf(!isProduction, sourcemaps.write("../../maps")))
    .pipe(gulp.dest("./build/js/minfiles"));
}
In the watchTask, change minifySepJS to buildSepJSProd.
Also, toward the bottom of the file, replace all exports references of minifyJS with compileJS.
We can now uninstall pipeline, as it is no longer needed.
npm uninstall pipeline…And remove from gulpfile.js.
const { pipeline } = require('stream');Updating the Sourcemaps
One other thing I asked the AI about was how to have the minified files read our sourcemaps. In the older version of the Gulp setup, I was changing the files in functions.php into their non-minified equivalent. I simply didn’t know how to fix this.
The fix for this is dead simple. Just add { loadMaps: true } to the minification scripts, as shown below for the minifyStyle function.
function minifyStyle() {
  return src(['dist/css/**/*.css', '!dist/css/**/*.min.css', '!dist/css/layout-styles.css'])
    .pipe(gulpIf(!isProduction, sourcemaps.init({ loadMaps: true })))
    .pipe(cleanCSS()) .pipe(rename({ suffix: '.min' }))
    .pipe(gulpIf(!isProduction, sourcemaps.write('.')))
    .pipe(dest('dist/css'));
}
This loads any previously used sourcemaps. We can update the other CSS minifier scripts accordingly.
Adding a CSS Final Build Helper
To make it easier to prepare CSS files for production, we can create a buildCSS export that combines our minification and concatenation scripts.
exports.buildCSS = series(
  minifyStyle,
  minifyWCStyle,
  concatLayoutCSS,
  concatAnimCSS
); // Run with --production flag for final build
We’ve put a note specifying to run this with --production tacked on the end.
Conclusion
If you are following this tutorial on your own computer with your own text editor setup at home, the JavaScript minifier, terser, is probably working correctly.
After some further questioning of the AI and some testing of the buildJSProd function, it turns out that the files were minifying but my text editor needed to reload the final file– scripts.min.js.
If you are using Neovim like I am, you may need to type :e! into the command prompt to reload the editor.
So, we may have made some changes that might not have been necessary. I still, however, think it was a good idea to separate concerns of processing files vs. minifying for final build.
This was a long one, but stay tuned for the next tutorial about updating Sass. Thanks for reading.
Featured image by Hung Diesel from Pixabay.
Leave a Reply