Hide and Show Controls in the WordPress Customizer With a Radio Button
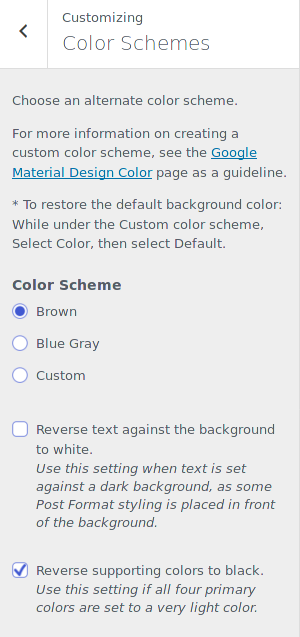
You’ve probably seen the action of hiding Customizer controls until you click a radio button within the Static Front Page section. You have a choice between Your latest posts and A static page. When a user selects a static page, two more controls appear.
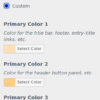
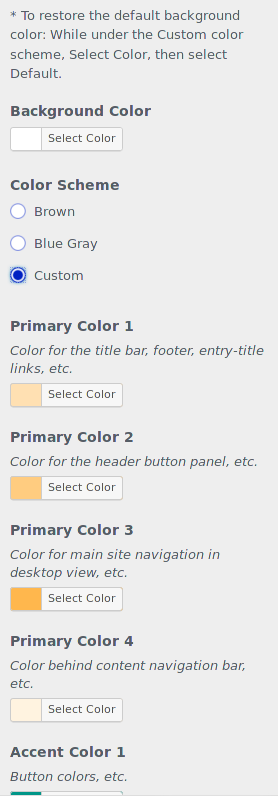
Even though I couldn’t figure out exactly how they did it in Core, I came up with my own solution using part of the Customizer JavaScript API and jQuery. I used this method while creating a color scheme selection with two premade color schemes and a Custom option. In it, when a user chooses the Custom radio button, it reveals several Color Pickers.
Creating some Customizer controls
The Controls/Settings
The given examples are just basic Customizer controls and settings, following the example in the Codex. I will give an example of some of the options I used in The M.X. (at the time) as an example, replacing the M.X. slug with theme_slug:
$wp_customize->add_setting(
    'theme_slug_color_scheme', array(
        'default' => 'brown',
        'sanitize_callback' => 'the_mx_sanitize_color_choices',
    )
);

$wp_customize->add_control(
    'theme_slug_color_scheme', array(
        'type' => 'radio',
        'label' => esc_html__( 'Color Scheme', 'theme-slug' ),
        'section' => 'colors',
        'choices' => array(
            'brown' => esc_html__( 'Brown', 'theme-slug' ),
            'custom' => esc_html__( 'Custom', 'theme-slug' ),
        ),
    )
);
* The theme code in the example has been updated to reflect current WordPress standards.
* The code in The M.X. has since been changed and no longer reflects the code in this tutorial.
The first setting/control combination adds a radio button selection to WordPress’s default Colors section. the Brown selection would be the default.
$wp_customize->add_setting(
    'theme_slug_custom_primary_1', array(
        'default' => '#795548',
        'sanitize_callback' => 'sanitize_hex_color',
    )
);

$wp_customize->add_control(
    new WP_Customize_Color_Control (
        $wp_customize,
        'theme_slug_custom_primary_1', array(
            'label' => esc_html__( 'Primary Color 1', 'theme-slug' ),
            'description' => esc_html__( 'Color for the title bar, footer, entry-title links, etc.', 'theme-slug' ),
            'section' => 'colors',
            'settings' => 'theme_slug_custom_primary_1',
        )
    )
);

$wp_customize->add_setting(
    'theme_slug_custom_accent_1', array(
        'default' => '#ffa000',
        'sanitize_callback' => 'sanitize_hex_color',
    )
);

$wp_customize->add_control(
    new WP_Customize_Color_Control (
        $wp_customize,
        'theme_slug_custom_accent_1', array(
            'label' => esc_html__( 'Accent Color 1', 'theme-slug' ),
            'description' => esc_html__( 'Button colors, etc.', 'theme-slug' ),
            'section' => 'colors',
            'settings' => 'theme_slug_custom_accent_1',
        )
    )
);
Here, I am only showingu two more control/setting combinations for brevity’s sake. Keep in mind that only the idea is being shown here. So, in your theme, your radio buttons may be a selection of something else entirelthis tu.
Validating
In order for the controls to work, we must add validation to each control. sanitize_hex_color handles making sure a valid hex code is returned to the database. We must also create the callback for our radio buttons that only accepts the values found in our choices, or return a default, as shown below:
function theme_slug_sanitize_color_choices( $input ) {
    if( !in_array( $input, array( 'brown', 'custom' ) ) ) {
        $input = 'brown';
    }
    return $input;
}
Analyzing the Output
Once we have created the validation functions, the controls should show up in the Customizer. Since this tutorial deals with only the behavior of the controls themselves, we won’t focus on the changes the controls will make on the front end. What we can show an example of is the code that is generated by WordPress. If you were to right click in your browser on one of your controls you just created, and Inspect Element, you may see code similar to this:
<ul id="sub-accordion-section-colors" class="customize-pane-child ... open">
    ...
    <li id="customize-control-background_color" class="customize-control customize-control-color" style="display: list-item;">
    ...
    </li>
    <li id="customize-control-the_mx_color_scheme" class="customize-control customize-control-color" style="display: list-item;">
    ...
    </li>
    <li id="customize-control-the_mx_custom_primary_1" class="customize-control customize-control-color" style="display: list-item;">
    ...
    </li>
    <li id="customize-control-the_mx_custom_accent_1" class="customize-control customize-control-color" style="display: list-item;">
    ...
    </li>
</ul>
I used pseudo code here with the ellipses replacing the actual rendering code for the controls because WordPress generates a lot of code. We are only looking at the li tags that each control sits in, however. Note the id titles, as we will refer to them later in our script.
Enqueueing a script that will manipulate our Controls
Creating the customize-controls.js file
function theme_slug_customizer_controls() {
    wp_enqueue_script( 'theme-slug-customizer-controls', get_template_directory_uri() . '/js/customize-controls.js', array( 'jquery' ), '20170412', true );
}
add_action( 'customize_controls_enqueue_scripts', 'theme_slug_customizer_controls' );
The next step is to enqueue a script specifically for our controls. If you are using Underscores as a base for your theme, as I am, you can write this function in your customizer.php file.
You can place this function directly in your functions.php file, if you prefer. If your scripts are in a different folder, adjust the paths accordingly.
Now, we can create the customize-controls.js file. In it, enter a wrapping function:
/**
 * Scripts to alter the behavior of Customizer controls.
 */
( function ( $ ) {

} ) (jQuery);
This assigns the $ sign to the jQuery object. In this file, we will enter the first parts of our inner function.
Array of IDs
( function ( $ ) {
	wp.customize.bind( 'ready', function() {

		function hideShowColorControls() {
			/* Hide and show controls for Background Color and custom color schemes when "Custom" color scheme is chosen */
			// array for our id titles
			var colorControlIds = [
				'theme_slug_custom_primary_1',
				'theme_slug_custom_accent_1'
			];
			var bgColorControlId = '#customize-control-background_color';

		}

	} );
} ) (jQuery);
The wp.customize.bind( 'ready' ... ) bit of code checks that all controls and settings are loaded before adding our code. Next, we set up an array with the id titles of our two custom controls, taken from the Customizer settings. We also will hide the included Background Color by default, as well, indicated by the ID #customize-control-background_color. You can find this control by right clicking it and inspecting it with the browser.
Hiding and Showing Controls
The next part is setting up an if-else statement that determines if we chose custom or anything else (brown) in our radio button control. Right after the variable setup, type the if statement:
			if ( wp.customize.instance( 'theme_slug_color_scheme' ).get() === 'custom' ) {
				$.each( colorControlIds, function ( i, value ) {
					$( '#customize-control-' + value ).show();
					$( bgColorControlId ).show();
				} );
			} else {
				$.each( colorControlIds, function ( i, value ) {
					$( '#customize-control-' + value ).hide();
					$( bgColorControlId ).hide();
					//console.log( '#customize-control-' + value );
				} );
			}

			return hideShowColorControls;
		}
	} );
} ) (jQuery);
What we are doing here is retrieving the current value of the control with the id ‘theme_slug_color_scheme’, using the Customizer JavaScript API .get() function and comparing it with the string ‘custom’. If it is equal, then we use jQuery’s each function to loop through each control.
Reading through the documentation for the each function, it accepts two arguments, an integer index and the element in the array. We’re interested in getting the element name, specified with the variable value. We look for each control that begins with #customize-control- and add each value from our array (colorControlIds). Along with bgColorControlId, we use jQuery’s show function. Otherwise, if the .get() function is not equal to ‘custom’, we hide everything. The return statement executes this function when called.
Calling the function
Now we want to call this function twice–once when the page loads, and then on change. Outside of the hideShowColorControls function, call it twice.
		}

		// Call this function on page load
		hideShowColorControls();

		// ... and on radio button change
		$( '#customize-control-theme_slug_color_scheme' ).on( 'change', hideShowColorControls );

	} );

} ) (jQuery);
What happens on change, is that it switches the Color Pickers between show and hide based on the condition if custom is chosen or not. If you look at the code for the controls now, the list items that have become hidden have the inline style display: none applied to them.
Conclusion
In WordPress’s Static Front Page section, the underlying code for this functionality is probably written differently, but this method is based on a few new things I learned and the current limits of my knowledge. Since it worked, I think it achieved the goal to hide Customizer controls. It may fulfill similar functionality for a theme or plugin you’re creating. Below are images of the before and after.
Resources
Below are some of the articles that were very helpful.
3 Comments
Trackbacks and Pingbacks
Trackback URL for this post: https://www.jasong-designs.com/2017/05/04/hide-show-controls-wordpress-customizer/trackback/
-
[…] Googling, I found quite a bit on how to show/hide a page element, including these two articles from Tom McFarlin and Weston Ruter. However there wasn’t a whole lot on how to hide and show customizer controls based on other control settings. The most useful resource I found was wp-content/themes/twentyseventeen/assets/js/customize-controls.js. Yep, I read the source code. Other resources I located included this WordPress StackExchange question and it’s gist, gavick.com, envatotuts+, another WordPress StackExchange post, Anthony Hortin with Part 2, Florian Brinkmann and his gist, and Jason G. Designs. […]
Thanks for this code and control. I will use definately.
This code works like a charm.
Thank you for sharing. 🙂
I have rewriten the code for my controls. and it works very well.
wp.customize.bind(‘ready’, function () {
function hideShowColorControls() {
console.log(‘hsc’)
var colorControlIds = [
‘preheader_bg’,
‘preheader_font’,
‘preheader_link_color’
];
var bgColorControlId = ‘#customize-control-preheader_bg’;
if (wp.customize.instance(‘preheader_sticky’).get() == 1) {
$.each(colorControlIds, function (i, value) {
$(‘#customize-control-‘ + value).show();
$(bgColorControlId).show();
});
} else {
$.each(colorControlIds, function (i, value) {
$(‘#customize-control-‘ + value).hide();
$(bgColorControlId).hide();
//console.log( ‘#customize-control-‘ + value );
});
}
return hideShowColorControls;
}
hideShowColorControls();
$(‘#customize-control-preheader_sticky’).on(‘change’, hideShowColorControls);
});
Thank you for using this code. I’m happy it was of help.