Creating a Chrome Effect in GIMP 2.6
Originally Dated: 25 July, 2009
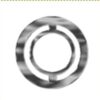
This tutorial teaches users of GIMP (GNU Image Manipulation Program) how to create an object with a chrome look, similar to what has been done in Photoshop many times.
An example of this style can be seen on one of my Zazzle designs. A warning is that this design has one curse word on it.
Getting Started/Creating Our Circle Object
In this tutorial, we will make a circle shaped emblem with a chrome finish in Gimp 2.6. Along the way, we will learn how to work with selections, create a bump map, use filters and adjust levels and curves. It is geared toward intermediate users but written for beginners to follow. I’m pretty much a beginner in GIMP as well.
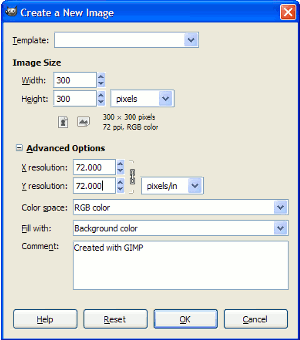
- First we open a New file with 300 by 300 pixels and 72 dpi as shown below and make sure the background color is white
- Save As with an appropriate title
- Next, we create a New Layer by clicking the New Layer button in the Layers, Channels, Paths… dialog. We double-click the layer and change the title to emblem. (The New Layer button looks like a piece of paper with a corner folded). If you accidentally close that dialog, we can bring it up again by choosing Windows > Recently Closed Docks. If the dialog is not showing, we can bring up the Layers dialog by using the keyboard shortcut Ctrl-L
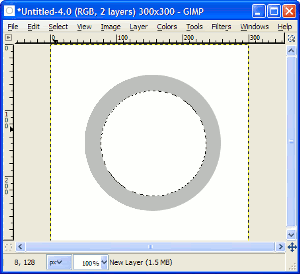
- We next create a circle, holding down the Shift key to make it proportional. We will use the Bucket Fill Tool (found in the Toolbox) to fill the circle with the color R: 191, G: 191, B: 191. Click the Foreground swatch to change the foreground color
- Now, we will click the Scale Tool (in Toolbox) to scale the selection of the circle. Underneath the Scale dialog, there will be a label that says Transform. Next to that, we click the red box icon (when we mouse over, it will say “Selection”). Click within the original circle selection and the Scale dialog box comes up. Under Width and Height, type 160 for each. Click Scale
- We will have to re-center the new selection by approximating. Click the Move Tool and once again click the Selection button in the Move dialog. Approximately recenter the circle selection. Hit the Delete key. Our image should look as below:
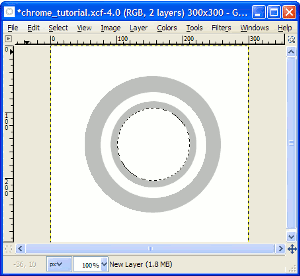
- We must scale the circle selection and recenter again using the same technique as above. This time enter Width and Height values of 130. Fill with R: 191, G: 191, B: 191
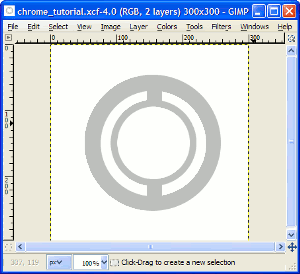
- We need to repeat this process (for the last time), scaling to W: 110, H: 110. Recenter by Moving and Delete the innermost circle. How this looks is pictured below.
- We can deselect by clicking the Rectangle Select Tool and clicking outside of the drawing. Then we use the Rectangle Select Tool to draw a rectangle through the center of the circle as shown below.
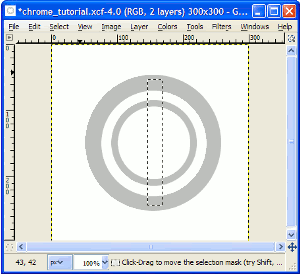
- Holding the Ctrl key, we draw a larger rectangle from just inside the innermost circle (this subtracts the second rectangle from the first). We Fill with our gray color. We should now have the following:
Creating the Basic Texture and Bump Map
- Next, we apply the Solid Noise filter. Select the emblem using the Fuzzy Select Tool in the toolbox. We can use the defaults for this solid color. Next, we go to Filters > Render > Clouds > Solid Noise. I used X size: 2.0 and Y size: 8.0, but you may want to experiment here using your preferences
- Now, we will prepare the bump map that will give our emblem a three dimensional look. With the emblem shape still selected, Copy (Ctrl-C) and create a New Layer. Paste (Ctrl-V). Fill the layer with white (you can swap background and foreground colors by clicking the arrows next to the color swatches). If necessary, we may have to go to the Layer menu > Anchor Layer. Rename the layer bump map (double-click to rename). Move the layer beneath the top layer by clicking the lower this layer (down pointing arrow) icon in the Layers dialog. Our layer situation looks like the following:

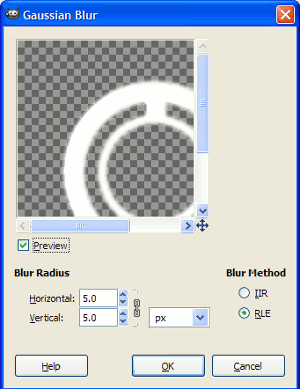
- Next, we will create the bump map. Select None by hitting Ctrl-Shift-A (this is important). Still on the bump map layer, we apply a Gaussian blur. For now, we can hide the emblem and Background layers by clicking the eye symbol next to them. Then we go to the Filters menu item > Blur > Gaussian Blur. We can stick with the default settings of blur radius 5.0
- The next step is for us to apply the bump map to our emblem item. We select the emblem layer and make it visible, then we go to Filters > Map > Bump Map. Choose our bump map layer as the bump map and click OK to use the default values. Now, we need to hide the bump map layer and make the background layer visible as shown below:
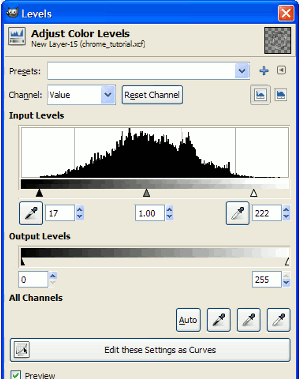
- Next, we edit the Levels on the emblem layer under Colors > Levels. Adjust as shown in the screenshot below:
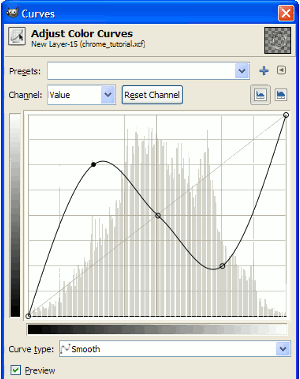
- In the final creation step, we go to Colors > Curves to give us the final high gloss look. We can click on the curve line to add a point and drag. Adjusting as shown below seems to achieve a gloss effect. Experiment here to your liking as well
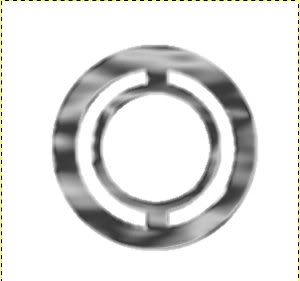
- Finally, we must get rid of the jagged aliased lines around the emblem layer. Go to Layer > Mask > Create Layer Mask. Under Initialize Layer Mask to, select Layer’s Alpha Channel. While the layer mask is still selected, apply a Gaussian Blur with X and Y radius of 10.0This method does not get rid of the jagged lines enough, so after Googling several tutorials on anti aliasing in GIMP with no such luck, I experimented and came up with a new method. In the screenshot below, I’ve already applied this method to everything except the center, which we will use as an example.

- First we select the areas with the Fuzzy Select Tool and it’s default settings. Do one area at a time for each section by first selecting the area outside the emblem, then following steps 2 to 6. Do the same for each inside section (steps 2 to 6). In this case we’re selecting the center
- We go to Select > Border and Border Selection by 2 pixels
- Next, we apply a Gaussian Blur of 4 pixels Horizontal and Vertical. Select None by hitting Ctrl-Shift-A
- We now reselect with the Fuzzy Select tool and Grow the selection (Select > Grow) by 1 pixel
- The next step is to the change the selection to a path for a smoother edge (Select > To Path)
- Finally, we hit delete to remove the section
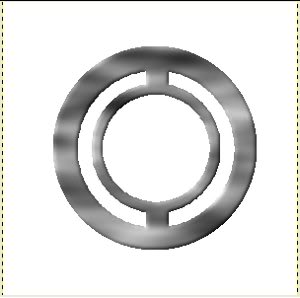
The final image is below:
This method of anti-aliasing is more tedious than applying a mask but yields much better results IMO. What I did not know until reading some forums on GIMP is that I could have changed my selections to a path ahead of time and saved the trouble at the end. Oh well, we learn something new everyday. What I also discovered was how to quick fix what has already been done.
*Fixing jagged lines in GIMP is furthered explored in the follow up tutorial Getting Rid of Jagged Lines in GIMP 2.6.
Interested in more digital imaging tutorials? Point your browser to JGPWS.com.
Comments from Previous Readers
These were some of the comments from the former Squidoo lens.
from iggy
very good tutorial. thanks!
from wwlkars
nice one! why this symbol? what ‘s it stand for?
My response to wwlkars
Hello wwlkars,
I did not plan anything specific for the meaning of this symbol, except to show an example of rounded shapes to see how Gimp works with them. Even though it has no specific meaning, at the time I was working on this I was thinking of the symbols seen on the back of cars.
Trackbacks and Pingbacks
Trackback URL for this post: https://www.jasong-designs.com/2013/10/13/creating-a-chrome-effect-in-gimp-2-6/trackback/
[…] not offer anti-aliasing on the fly, like Photoshop does. While experimenting in my last tutorial, Creating a Chrome Effect in GIMP 2.6, I figured out a way to fake anti-aliasing on rounded edges after drawing with Selection tools that […]